If you are using an accounting package to manage your organisation's accounts, you can create custom reports in order to export the data in the right format to upload into your accounting package. These reports can include all of the information in the standard Sales report, plus some additional fields.
Configuring the Custom Report
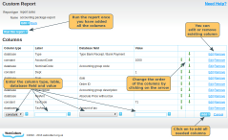
To create a custom report click on Add new in the custom reports section. Give your report a name and click on add.
For each column of the report you can do the following:
- Column Type. Select constant or database for the discriminator. Select a constant if you want this column of the report to have a constant value in it for all rows. Use database if you want the value to come from the WebCollect database.
- Label. Give the column a name, which will be displayed as a header in the top row of the output file
- Database Field. Select which piece of information you want from the WebCollect database. See below for a list of possible fields you can extract from the database.
- Value. Column type: Constant only. Specify what you want the constant value to be.
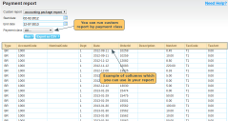
Once you have added all the columns that you want, these will be saved in your custom report. You can then run the report at any time, specifying the period for which we want the data. You can also run the report for each individual payment type (cash, cheque, cards, Paypal) if you want to know how your members are paying.
The possible database fields you can include in the report are:
- Item description (name of event ticket, subscription etc)
- Tax rate
- Price with tax (note: discounts are shown as negative amounts)
- Price without tax (note: discounts are shown as negative amounts)
- Accounting group code
- Accounting group description
- Time of sale (note this will be the time the sale is recorded, ie order status updated to payment received, not order placed)
- Date of sale (note this will be the time the sale is recorded, ie order status updated to payment received, not order placed)
- Order number (order id)
- Sale processed by (name of organisation administrator who updated order to status: payment received)
- Refund processed by (name of organisation administrator who updated order to status: refund given)
- Amount of tax (VAT)
- Type: Sale or Refund
- Absolute price with tax (always positive, regardless of whether it is a sale, refund or discount)
- Absolute price without tax (always positive, regardless of whether it is a sale, refund or discount)
- Type: Bank Receipt or Bank Payment. Indicates cash flow direction (money coming in or going out..)
- Absolute amount Tax (VAT) (always positive, regardless of whether it is a sale, refund or discount)
- Purchaser name
- Payment method
- Purchaser unique member id ("none", if you have not given them a unique member id)
- Purchaser's unique group id ("none" if they are not in a group)
- Combined group id and unique member id
For standard accounting packages, such as Sage, use these 4 values:
- Absolute price with tax (always positive, regardless of whether it is a sale, refund or discount)
- Absolute price without tax (always positive, regardless of whether it is a sale, refund or discount)
- Type: Bank Receipt or Bank Payment. Indicates cash flow direction (money coming in or going out..)
- Absolute amount Tax (VAT) (always positive, regardless of whether it is a sale, refund or discount)
Running the Custom Report
Once you have configured the custom report, to run the custom report: First run the standard sales report (the quickest way is to click on the last week link. From the report screen, you can then select the custom report you want to run and configure the date range for the report.

