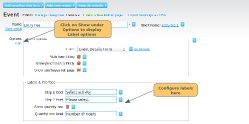
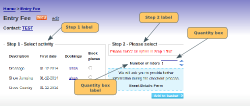
You can customise the labels that show on your event page. This is particularly useful if you have configured different types of activities as date options.
On the event page in the admin panel, click on the Show link under the Options section, to display the label options section. See the screenshots below to see where they show on the page.
Step 1 label
The default text is Select Date. If you have configured different activities for each date option, you might want to change this to Select Activity or Select Class. If you have only one date field configured, you may want to put Please Select (note, it will be pre-ticked for the member)
Step 2 label
The default text is Select Type. If you have only one price option configured, you may want to put Please Select (note, it will be pre-ticked for the member).
Quantity label
The default text is Number of Tickets. Other suggestions are: Number of Members, Number of people.
Note: If you untick the quantity box option, then the quantity label won't be displayed.
Show quantity box
Untick this box if you don't want the quantity box to be displayed on the event page.
This is useful if you don't want members to buy more than one ticket (although that won't stop them going back and clicking on add to basket if they are really persistent).

