Summary:
Editing and Removing Categories
Assigning Events to Categories
Removing an Event from a Category
Creating an Event Category
From the administration home page, click on "Manage" in the Events section. On the left hand side, you will see a folder called Home. If you right click on Home, a menu will pop up. Click on new category.
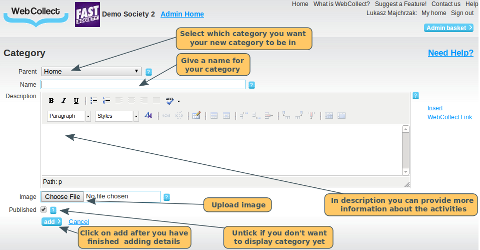
You must give the category a name, but you also have the following options:
Parent - Select which category you want your new category to be in. Categories with Home as a Parent will be displayed on your Organisations home page (under the description you have provided). Categories with another category as parent will be displayed once members click on the parent category.
Example - My club's activities can be divided into training and social activities. Training can be further divided into Beginners and Advanced. Create the training category (Parent Home) and the social category (parent Home), Then create Beginners (parent Training) and Advanced (parent Training).
Name - Pick something that is reasonably short (no more than 3 or 4 words preferably, but up to 128 characters is allowed). This will be displayed on the organisation home page if the category has Parent Home.
Description - This is where you can provide some more detailed information about the activities in this category.
Image - Your WebCollect pages will look much nicer if you upload images for your categories. They can be landscape or portrait (minimum size 140 by 140 pixels). Images for categories with Parent Home will be displayed on your organisation's home page on WebCollect. This looks best if all your category images are the same size (or at least have the same aspect ratio).
Published - Ensure this is ticked for your category to be displayed to members. Note: If your category is unpublished, but has events assigned to it that are live, the events will still be displayed in the Upcoming Events section on your organisation's home page.
When you have added the category's details, click on Save.
Editing and Removing Categories
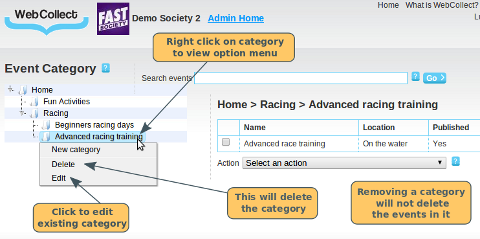
To edit a category, right click on the category and select Edit. Once you have made your changes, click on save.
To remove a category, right click on the category and select Delete. Note: removing a category will not delete the events in it. These will still be displayed in the Upcoming Events list on your organisation's home page.
Assigning Events to Categories
From the Event Category Page
From the administrator home page, click on "Manage" in the Events section (if you have just created a category, you are already there).
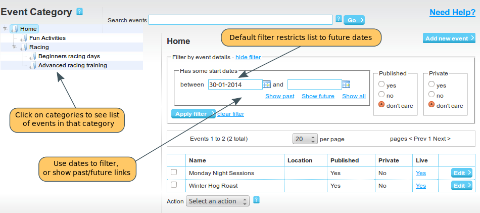
All events are automatically added to the Home category. So to see the full list of all events, left click on the Home category. You will see the list of events in the right hand column. If you want to see what events are in a particular category, left click on the category. You will then see just the events in that category displayed on the right hand side.
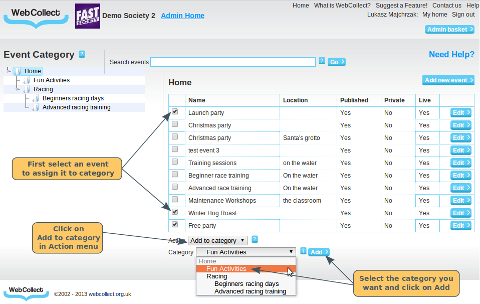
To assign an event to a category, select the event by ticking the box to the left of the event name (you can tick multiple boxes). Then click on "Select an action". A dropdown will appear. Click on "Add to category". A new dropdown will appear with the full list of categories. Select the one you want and click on Add.
If you have made a multi-level set of categories (as in our example where Training has Beginners and Advanced), add the event to the bottom level category (e.g. beginners). It will automatically show in the list of Upcoming Events when members are on the parent category page (ie all Beginner events will automatically show in the Training list).
You can add an event to as many categories as you like (just repeat the process above).
From an Individual Event Page
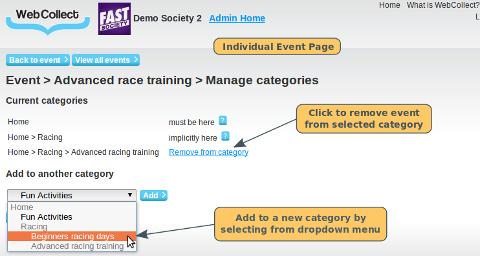
Find the event and click on the edit button. At the top of the page, click on the link "Manage categories" link. Here you will see the list of categories that the event is currently in (note: events are always in Home).
You can add it to a new category by selecting the category from the dropdown and clicking on Add. To remove, click on the "remove from category" link.
Note: If you see a category listed, but with no "remove from category" link, this is because the event is in a sub-category of that category. You need to remove it from the sub-category - once it is removed from all sub-categories, it will automatically disappear from that category as well.
If you want to create a new category for this event, click on the "create new categories" button.
Removing an Event from a Category
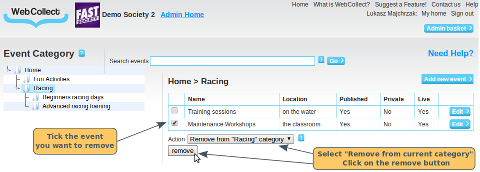
Left click on the category. Tick the box of the event(s) you want to remove and select "Remove from current category" from the dropdown. A "remove" button will appear. Click on the button.
Search
If you can't find the event you are looking for, you can use the search box (just start typing and a list of events to choose from will appear). You can also use the filters at the top of the list to search for events by date. By default the list of events that are shown, are the events with a date in the future. There are quick links to Show Past events, Show Future event, or Show all. Alternatively you can type in a date range. Where an event has multiple dates, it will be displayed if any of its dates match the criteria.

