Approving/Rejecting the Membership Application
Email Notification
Administrators who have the role creator or operator, will automatically receive an email each day, listing all new members who applied the previous day. Click here to find out more about administrator roles.
Finding who is pending approval
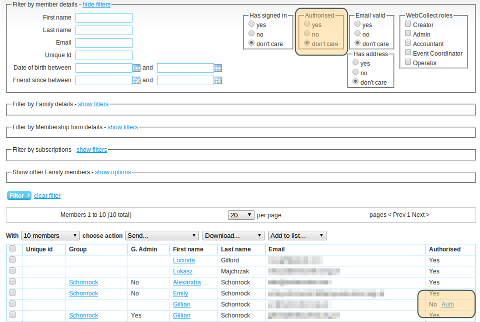
In the administration panel, click on the members link in the Membership Summary section. Prospective members who have applied, and are pending approval, will be listed as "Authorised: No". If your list of members is large, in the "Filter by member details" section, click on Authorised: No, to see just the ones who are pending approval.
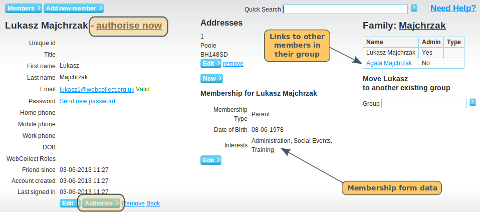
To view the member's details, including their membership form, click on the person's first name.
If you went for option 1) above, and the member has selected a subscription, on the member's details page, you will also see details of the application order they placed. Click on the order number, to see details of the subscription they selected (and subscription form, if relevant).
Authorising a Member
There are a number of places where you can authorise a member's application:
- On the member's list page, click on the Auth link next to the member
- On the member's details page, click on the Authorise Now link (top left) or Authorise Button (bottom left)
- On the order page. If the member selected a subscription first, they will have made an application order. You will see this listed in the Orders section, with Order Status: Application Submitted. If you go to the order detail screen, you can update the order status to Application Accepted.
When you authorise a member (by any of these methods), the following happens automatically:
- Their status in WebCollect changes to Authorised. This will be displayed on the member's list and member's details page
- All other members in their group will be authorised at the same time (saves you having to do each one individually. If you did NOT want to authorise some of the members in the group, see section below on Rejecting members.
- Any application orders placed by or on behalf of that member (or any member of their group) are automatically updated to Order Status: Application Accepted.
Next Steps
If the member had already selected a subscription (Option 1 above), when the order status of the order changes to Application Accepted, the member is automatically sent an email. This email confirms that their application has been accepted, and provides them with a link to the order, to complete the process by making payment. Once the member makes payment, and the order has been updated to order status: Payment Received, the subscription will be created. Click here for details on processing orders, including changing order statuses.
Rejecting/De-authorising a Member
If the member had already selected a subscription (Option 1 above), go to the member's order in the administration panel. Update the order status to Application Rejected. By default this will send an email to the member notifying them that the application has been rejected. Note: this is a standard order status update email. If you would prefer to send something more personalised, then send the email separately. When you update the order status, untick the "notify" box to prevent an email being sent by the system.
The member will remain on your members' list as Authorised: No (in case you change your mind..). If you want to permanently remove them from the list, then you should remove the member from the organisation. To do this, go to the member's page in the administration panel and click on Remove.
Rejecting one member within a group: If you have a group application, and wish to accept some but reject others within the group, then you need to accept the whole group. You can then de-authorise individual members (see below).
De-authorising a member: To de-authorise a member, go to the member's details page and click on the De-Authorise link. If you want to de-authorise multiple members in a group, go to the member's page for any one of the members and click on the link to their group page (top right clickable name of the group). On the group page, you can de-authorise individual members of the group by unticking the relevant members in the "Auth'd by" column.
De-authorising a member will remove their access to member only pages (such as events that you have specified to be members only). Note: lapsed members (those who have not renewed their subscription but are still authorised) will still be able to view those pages.

