Inserting WebCollect links
When writing content for your WebCollect pages, or writing emails to members, if you see the link "Insert WebCollect Link" on the right hand side of the page, you can insert a WebCollect link.
How to insert a link
Place your cursor at the relevant point in your text where you
want to insert the link. Then click on Insert WebCollect
link. A box will pop up.
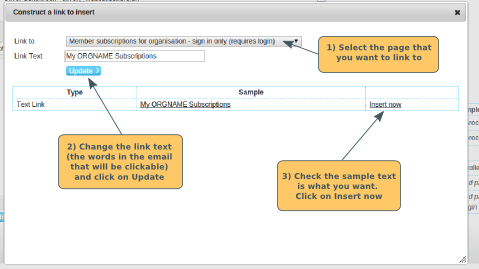
Click on the dropdown link to select the page that you want to link to. The options are:
- Organisation's home page on WebCollect (i.e. https://webcollect.org.uk/ORGNAME)
- Available subscriptions (i.e. https://webcollect.org.uk/ORGNAME/subscription). Use this link if you want the recipients to buy a new subscription. Do not use this link to ask them to renew an existing subscription.
- Member home for organisation (requires login). This is the page where members can see a summary of their subscriptions, event tickets, orders, profile information etc.
- Member subscriptions for organisation - sign in or sign up (requires login). It is better to use the option below.
- Member subscriptions for organisation - sign in (requires login). This takes the member to their My Subscriptions page. From there, they can renew their subscriptions, and edit their subscription forms
- Administrator home for organisation (requires login). Use this link if you have given a member administrator rights, and want to introduce them to the administration panel.
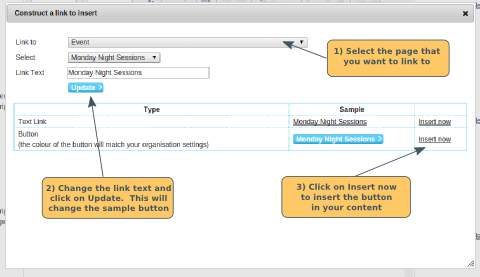
- Event Category. When you select this option, a second dropdown will appear. Click on that dropdown to select the event category that you want to link to
-
Event. When you select this option, a
second dropdown will appear. Click on that
dropdown to select the event that you want to link
to. Note: the list of events that you see is
restricted to events that have a date (or Sell to date) in the
future.
Requires login. If you are selecting a
link that requires login and you are putting the link
in an
email, you may want to also include the
[sign_in_details] tag, so that the member has their login details
to hand. Click here for details on
how to insert a tag in emails.
Once you have selected the page that you want to link to, you will see the following options appear:
The link text is the text that will be inserted into the content/email. It will be displayed as a clickable link. When members click on the link, they will be taken to the page that you have just selected. If you want to change the link text, type your wording in the Link Text box, and click on Update.
Once you are happy that you have the right wording, click on the Insert now link to insert the WebCollect link into your content/email.
How to insert a button (site content only)
Follow the same process as above, but select the Insert now option next to the sample button. Note: The colour of the button will match your organisation settings (for all buttons on the site). Click here for details on how to change your button colours.
Sorry, this option is not available for links in emails, because people use a wide variety of email solutions to read email, and not all solutions will support this.
Changing the link or button once they have been inserted
If you want to change the link or button text, or where it links to, the simplest way to do this is to delete the link text and start again.
Inserting a link to another website
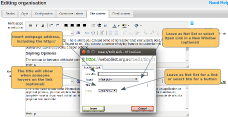
Type the words that you want to become clickable in the email. Then select the words (hold down the left click on the mouse or hold down shift and use the right arrow on your keyboard). Click on the chain link icon above the text area.
You should see a box pop up with 4 sections:
- Link URL: Type in the url (website address) of where you want to link to. Make sure you include the http:// bit at the start.
- Target:If you leave that as Not Set, clicking on the link will take the member straight to page that you are linking to. If you select Open in a New Window, then clicking on the link will open the page that you are linking to in a new window, leaving the page that the member was on still open.
- Title: If you put some text in here, that text will be displayed to the member when they hover over the link. Useful if you want to put some explanatory text.
- Class: Leave this as Not Set if you want a link. Click on the dropdown and select btn if you want a button.
Then click on Insert. The pop-up box will disappear, and you will see that the words you selected turn blue/underlined (or become a button).
To get rid of the link/button, select the words again, and click on the broken chain icon above.


