This is an example of the form questions you might want to add to an event form. Click here for details on how to create a form.
Form Name
If you are likely to use this form for multiple events, give it a generic name, e.g. Event Details Form, or Medical Consent Form. If it's a one-off form that will only be used for that event, you may want to give it a specific name, e.g. Rally Nov 14 Form.
Suggestions for Form Fields
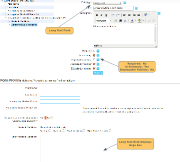
Participant's Name
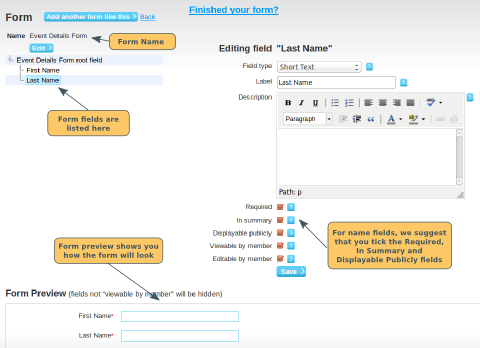
WebCollect will collect the purchaser's name automatically, but they may be buying for someone else. If you want to know for sure who is turning up, collect the participant's name. If you want tidy data, make first and last name 2 separate fields. Then you will be able to sort your bookings by surname etc. We suggest this configuration:
- Field Type: Short Text
- Labels: First Name and Last Name (or Surname)
- Description: Please provide the participants name
- Required: Yes
- In Summary: Yes (this means you will be able to easily print off a list of who is coming). Click here for details.
- Displayable publicly: Tick this if you want the participants' names to show on the event page. Useful for organisations where members like to know who else is coming. Click here for details
- Viewable by member: Yes
- Editable by member: Yes
Emergency Contact Details
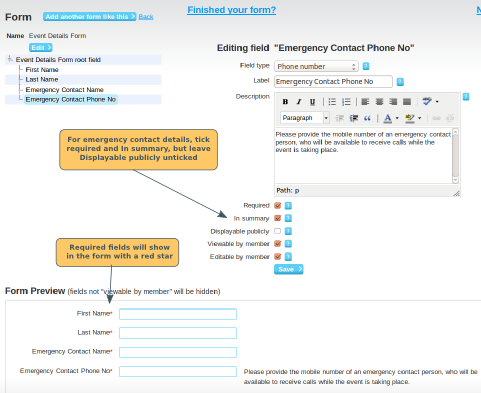
You may also want to collect emergency contact details. We suggest you collect Contact Name and Phone Number in this configuration:
- Field Type: Short Text (Name), Phone Number (Phone)
- Labels: Emergency Contact Name, Emergency Contact Phone No
- Description: Please provide the mobile number of an emergency contact person, who will be available to receive calls while the event is taking place.
- Required: Yes
- In Summary: Yes (this means you will be able to easily print off their details).
- Displayable publicly: No (you don't want to publish their name/phone number on the event page...)
- Viewable by member: Yes
- Editable by member: Yes
Medical Conditions
You can use a radio button question to restrict these questions only to those for whom they are relevant. Only those who answer "Yes" to the radio button question, will see the following sub-questions. Our suggested set of questions:
Do you have a medical condition we should be aware of?
- Field Type: Radio button
- Required: Yes
- Default "Yes": Not ticked. These means that the sub-questions are not viewable by default
- In Summary: No (The following questions are more useful for the summary)
- Displayable publicly: No
- Viewable by member: Yes
- Editable by member: Yes
Specific Medical Conditions
If you have specific conditions that you would like to know about, you can use a multi-checkbox question to ask about them. When creating the sub-question, right click on the radio button question (instead of on the root field)
- Field Type: Multi-checkbox
- Required: No
- In Summary: Yes
- Displayable publicly: No
- Viewable by member: Yes
- Editable by member: Yes
Other Medical Conditions
When asking broad questions that people might provide a lot of information for, use a long text field, which will give them more space to provide their answer in
- Field Type: Long Text
- Required: No
- In Summary: Yes
- Displayable publicly: No
- Viewable by member: Yes
- Editable by member: Yes
Permissions and Declarations
Use a radio button question if you want to allow the member to answer "Yes" or "No". If answering "Yes" is a condition of being allowed to attend the event, use a checkbox question. Our suggested set of questions:
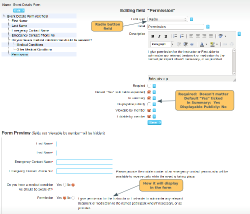
Permission
For example: "I give permission for the Instructor or First-aider to administer any relevant treatment or medication to the named participant when/if necessary, or as provided."
- Field Type: Radio button
- Required: Doesn't matter for a radio button
- Default "Yes": You can tick this, and the radio button will be displayed with Yes already pre-selected (ie the member has to actively change it to No. Or leave this unticked, and the member will need to actively change the answer to Yes.
- In Summary: Yes (so the person running the event knows whether they have permission
- Displayable publicly: No
- Viewable by member: Yes
- Editable by member: Yes
Declaration
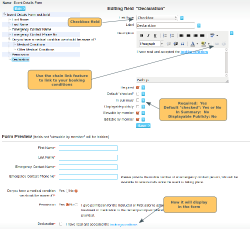
Using a required checkbox, means that the member cannot get past the form, unless they tick the box. Useful if you want to require them to agree to terms and conditions etc. You can create a link to Terms and Conditions on your website, by using the chain link feature. If your terms and conditions are in a document, you can upload them on the event page. Go to the event page, and click on the document link to get the url (webpage) for the document. Then use that in the chain link feature.
-
Field Type:
Checkbox
- Required: Yes
- Default "checked": You can tick this, and the checkbox will be pre-filled for the member, or leave this unticked, and the member will need to actively tick it. Pre-ticked is more convenient for the member, but might leave you open to claims that they didn't see/realise that they were consenting
- In Summary: No (all answers will be yes, so no need)
- Displayable publicly: No
- Viewable by member: Yes
- Editable by member: Yes
Adding the form to your event
Click here for details on how to add the form to your event.
Note: For the Displayable Publicly fields to show on the event page, you must also configure the event itself to display the fields publicly. Click here for details.
