Why use an event form?
Useful things you can do with an event form:
- Collect the name of the person attending (although the system will ask for their name during checkout, they might be buying for someone else).
- Obtain member's consent (e.g. Parental consent, or acknowledgment that they read the terms & conditions)
- Display on the event page a list of who has signed up (some members like to know who else is going...)
- Print off a summary of the forms completed - so on the day you have a list of who's coming, contact numbers etc.
- Set the form up so members only have to complete questions relevant to them
- Use the same form for multiple events (once you have done the hard work once, you won't need to touch it again)
Click here to see an example event form, showing the kind of information you might want to collect.
Creating the Form
Click here for details on how to create the form, and add form fields.
Adding your event form to the event
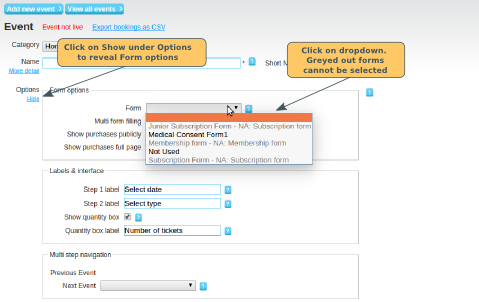
Once you have created your form, go the administration panel of your organisation. Find the event you want to add the form to and click on edit to open up the event page.
Click on Show in the Options section. Select the form from the dropdown. Click here for information on greyed out forms. Click on Save
Events with Multiple Dates
You can only have one form per event, even if your event occurs on multiple dates. Click here for details on the multi-form option, which allows you to configure whether a member who buys tickets for multiple dates, fills out one form for all the dates, or one per date.
Show Purchases Publicly
Click here for details on showing bookings publicly on the event page.
Exporting your Form Data
Click here for details on how to export your event booking data
