If you want to display on your event page, details of who has booked on the event, you need to create an event form to collect the information to display. Then you need to configure the event itself to display the information
Step 1: Create the Event Form
Click here for details on how to create a form
Click here for an example event form
When creating the form, tick the Displayable Publicly option for the fields that you want to be displayed.
Our suggestions for form fields that you might want to put in the form, to be displayed:
- Participant's name. WebCollect will collect the purchaser's name automatically, but they may be buying for someone else. We recommend that you collect the participant's name in a form.
- Participant's number. For some sports, the participant may have a unique number (e.g. sail number)
- Participant's category. If participants from different categories, are competing against each other, you may want to include their category
- Participant's age. Relevant for some sports. However, we would not recommend that you publish dates of birth! If you want to display age, use an age category.
- Participant's club. For open events, you may want to display which club the participant is a member of.
- Region/country. May be relevant for National/International events
Step 2: Configure the Event
Once you have created the form, you need to attach the form to the event that you want to use it for. Note: You can use the same form for multiple events.
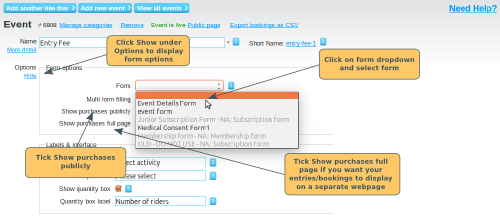
From admin home, click on Edit next to the Event to open up the event page. Click on Show under Options to open up the Form options section.
Click on the dropdown and select your event form. Click here for information on greyed out forms.
Tick the box Show Purchases Publicly.
You also have option to Show Purchases Full
Page: Tick this option if you want the bookings to
be displayed on a separate webpage. This
option is useful if you want to be able to link to the list of
entries directly from your website.
Don't forget to click on Save!
The multi-form filling option is only relevant for events where you have configured more than one date option. Click here for details.
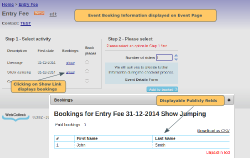
How the Bookings are displayed
See the screenshots below for how the bookings are displayed on the event page, or on a separate webpage (Show Purchases Full Page)


