Forms are used to collect additional information from members that is specific to your organisation.
Click here for information on how you can use forms.
Creating the Form
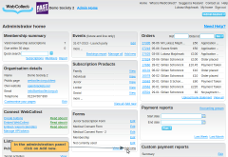
In the organisation's administration panel, in the form section, click on Add new. You will then be asked to provide a name for the form. This name will be shown at the top of the page when the member fills it out. Then click on Add.
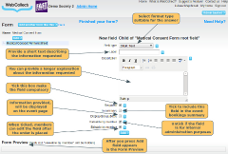
You now have a blank form. To add fields to the form, right click on the root field (left hand side of the page highlighted in light blue). You will see a dropdown appear. Click on Create new as child. For each field of the form, there are a number of sections to complete.
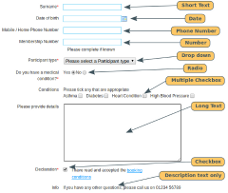
Field Type. Pick the type with a format suitable for the answer you want the member to provide
- Short text. Max characters 64.
-
Number. This must be an integer.
If you need a mix of numbers and letters use short
text. Note: don't use this for phone
numbers as it will ignore the 0 and doesn't like people typing
spaces. You can specify a number range.
Click here for
details.
- Phone number. Use this field for home, work and mobile numbers.
-
Date. This will be in the
form dd-mm-yyyy. You can specify a date
range. Click
here for details.
-
Long Text. Use this where you want to
allow members to provide a detailed answer
- Check box. This is useful for asking the member to declare they have read any terms or conditions, or giving permission for something. If you make the field a required field, then the member can't get past the form unless they tick the box.
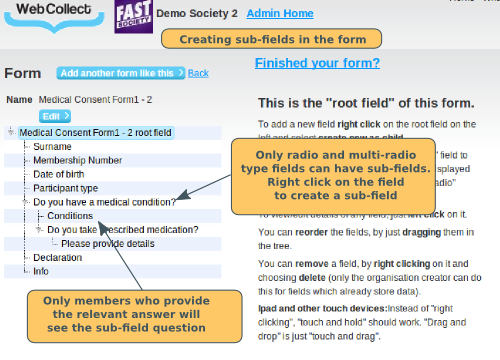
- Radio. Use this where you want the member to answer Yes or No. These are useful if you want to have a set of sub-fields which only need to be completed if the initial response is Yes. For example, use a radio button to ask people if they have any medical conditions that they should declare. The sub-fields will only be displayed to members who selected yes on the original field. See below how to create sub-fields.
- Multi-radio (branch). Use this where you want to be able to put sub-fields under more than one possible answer. Click here for details.
- Dropdown. Use this where you want members to select only one from a set of prescribed answers. When you hit save, you will see a new section appear below called "Possible answers". Click on add new answer to add the possible answers you want the member to select from.
- Multiple check box: Use this where you want members to be able to tick multiple answers from a prescribed list. When you hit save, you will see a new section appear below called "Possible answers". Click on add new answer to add the possible answers you want the member to select from.
- Description Text Only. Use this if you want to provide some information to the member (e.g an explanation about the information you are requesting. No answer is required from the member.
Name. Provide a short text describing the information requested. For example: Qualifications. Experience. Car make.
Description. If needed, you can provide a longer explanation about the information requested. For example: "Please provide each relevant qualification you have, plus the date on which it was obtained and the name of the organisation that granted the qualification."
Required. Tick this box if you require the members to answer the question. It will be displayed with a red *.
Default "Yes" (sub fields expanded) (Note: Radio button questions only). Tick this box if you want the form field to have "Yes" pre-selected (and the subquestions showing) when the member first views the form.
In summary:
- Event forms only. Tick this box if you would like this information to be displayed in the summary report for the event. The summary report is a convenient document you can print off. Names and emergency contact numbers are good for this.
- Subscription forms only. Tick this box if you would like this information to be displayed in the subscription renewal email or letter.
Displayable publicly. Event forms only If ticked, the information provided by each member will be publicly available for anyone who visits the event page to see. Useful if members like to see who else has signed up for an event. Don't tick it if the information is sensitive
Viewable by member. This is ticked by default and allows members to view this field when they log into their WebCollect account. Untick this if you do not want them to be able to view the information. Note: if you do this, the field will NOT show in the form preview (because the preview is designed to show you what the members will see). This is useful for internal notes fields.
Editable by member. This is ticked by default and allows members to edit the details they have provided in their form when they log into their WebCollect account. Untick this if you do not want them to be able to edit the information. Useful if you have information that you allocate to the member, and do not want them to be able to change.
Once you have completed the information, click on add.
Adding more fields and sub-fields
As you complete each field of your form, you will see in the Preview box below how the form will be displayed to the members. You can add a further field to your form, by right clicking on the root field again. The new field will automatically be displayed at the bottom of your form. Note: The form preview displays as members will see it. So if you untick the "viewable by members" box, you will not see the field in the form preview.
If you want to add sub-fields to a radio button field, right click on the field in the field list (top left under the root field) and select Create new as child. The sub-fields will only be displayed to members who selected the yes radio button in the original question. This is useful for example, if you only need members with medical conditions to provide information about their condition. Set the radio button question to something like "Do you have a medical condition that we need to be aware of? Those members who answer No to this question, will not see the sub-fields.
Click here for details on adding sub-questions to a multi-radio button field.
Reordering your questions
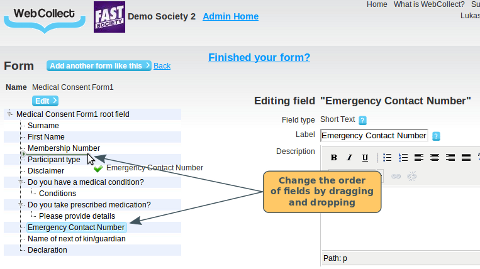
You can change the order of your fields by dragging and dropping them. When dropping, hover over the spot between the 2 fields where you want to insert it and you will see an arrow and line appear showing you where it will be inserted.
Adding your form to an event, subscription or making it your membership form.
Once you have created your form, you need to configure it as either an event form, a subscription form or as a membership form. Click here for details on the difference between a membership form and a subscription form.
- Click here for details on how to configure it as your membership form
- Click here for details on how to configure it as a subscription form
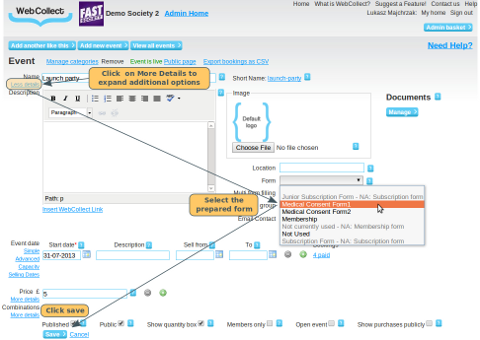
- Click here for details on how to configure it as an event form
go the administration panel of your organisation. Find the event you want to add the form to and click on edit.
Adding your form to a subscription
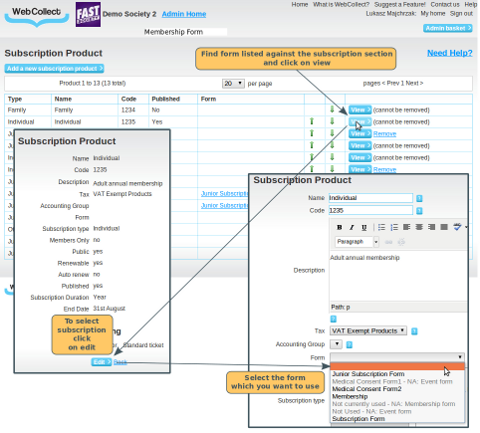
Once you have created your subscription form, go the administration panel of your organisation. Click on view all in the Subscriptions section. Click on View and then Edit for the relevant subscription. Then select your subscription form in the form dropdown menu and click on Confirm.
Configuring your form to be your membership form
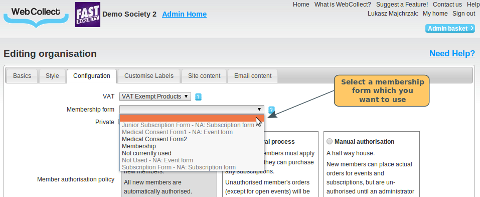
Once you have created your membership form, go the administration panel of your organisation. Click on edit in the Customise Your Organisation section. Click on the configuration tab. Then select your membership form in the dropdown menu and click on Save
