Summary:
Giving other members access to send to the List
Setting up a List
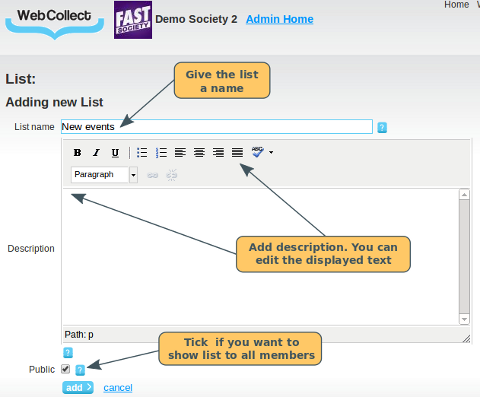
Anyone with a WebCollect role "Admin" can create a list. To create an email list, in the administration panel, click on "add new" in the Lists section. Give the list a name and a description. Tick public for lists that you want to be shown to members on their home page, so that they can choose to join the list. Then click on "add".
You will now see a summary of the list with yourself as the sole member on the list. You will have the role "Creator" of the list. There are 4 possible types of roles that members can have, relating to an email list:
- Member. Will receive emails sent to the list. In their organisation home page, will see the names and descriptions of the lists that they are on, but not the names of other members on the list. Will also be able to see public lists that they are not on, and have the option to add themselves to those lists. Can remove themselves from any list.
- Sender. Has everything that a member has plus can see the list of members for that list and send an email to the list. NOTE: For a member to be able to send to the list, they must also have a WebCollect role of at least Event Coordinator.. Click here for details on how to assign someone a WebCollect role.
- Editor. Has everything that a sender has, plus can add/remove members. Must have a WebCollect role of at least administrator.
-
Creator. Has everything that an editor
has, plus can change the roles of members and delete the
list. The person creating the list is automatically given
the role creator. Must have a
WebCollect role of at least administrator.
Note: there must always be a
creator of the list. If you want to
remove yourself from the list, you must make someone else
creator first.
Note: Anyone who has WebCollect role "Creator" can do any of the above, even if they are not a member of the list.
Adding members to your List
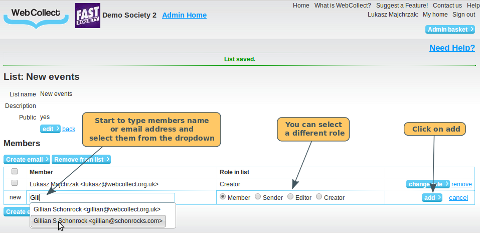
Adding members individually. On the list page, you can add each member individually. Start typing their name or email address and select them from the dropdown. By default they will be given the role "member", but you can select a different role. Click on add.
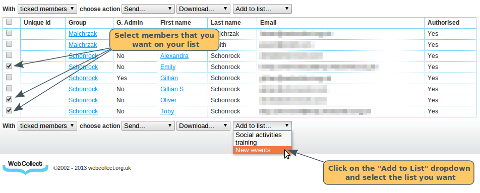
Adding groups of members. From the administration panel, click on the "members" link in the Membership section. Use the filters to select the set of members you want. Click here for details on how to use the filters. If you want to select your set of members to add, based on their subscriptions/subscription form data, then start on the Subscriptions page, and use the filters to select the set of subscriptions you want. Then click on the "Show Me" dropdown and select "Members" which takes you to the members screen. You can then further filter your members list. Click here for details on how to use the subscription filters
Once you have filtered the set of members that you want, click on the "Add to List" dropdown, and select the list you want from the dropdown. If you only want to select some members from the list, tick the boxes next to their names, before clicking on the Add to List dropdown.
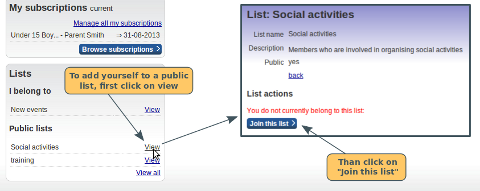
Public lists. Any member can add themselves to a public list from their organisation home page.
Sending an email to the List
Send to all. In the administration panel, you can click on the Send to all link next to the email list. This is a quick link to send an email, if you don't need to check who is on the list before you send.
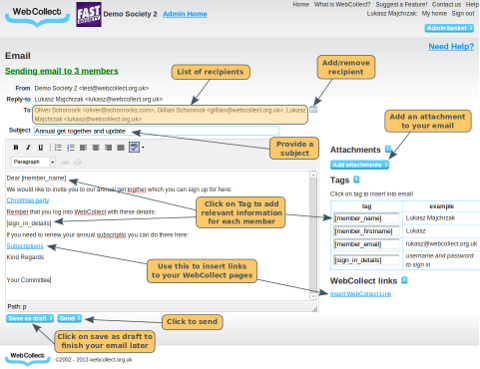
In the administration panel, click on "view" next to the list in the Lists section. Select the members you want to send it to by ticking the boxes in the left hand column (tick the top box to select everyone). Then click on "create email". You will then be asked to complete the subject and content of the email. Note: The "reply to" email address will be your own email address.
Adding an attachment to your email. You can attach files to your email. The documents can be pdf, doc, docx, xls, xlsx, ppt, pptx, jpg, png, gif. Maximum file size is 3MB for each attachment.
Adding tags to your email content. Click in the tag box to add the tag to your email. When the email is sent, the words inside the brackets will be replaced in each email with the relevant information for that member.
Adding WebCollect Link to your email content. Leave your cursor in the place in the email where you want to insert the link. Then click on "Insert WebCollect link". Select the page that you want to link to. Click on "Insert Now" next to the Text Link.
Saving a draft of your email. If you want to save a draft of your email to finish later, click on Save as draft. To find it later, click on View All in the Emails Sent section of the admin panel. Click on edit next to the draft.
Members who do not have a valid email address. If these members are in a group, the email will automatically go to the email address of the group admin instead.
Once you have sent the email, it will be shown in your list of recent emails sent in the administration panel. Click on view to see who it was sent to, the text of the email and any attachments that were sent.
The email will be sent to each member individually (so they won't see who else it was sent to).
Removing a member from a List
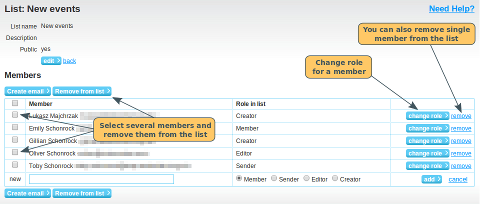
This can only be done by someone who is an Editor or Creator of the list. To remove a member from a list, click on "view" to go to the list. Click on remove to the right of the relevant member's name.
You can remove several members at the same time. To do this, tick them on the left and click on "Remove from list" button above.
Members can remove themselves from any list that they have been added to, via their organisation home page.
Removing the creator: There must always be a creator of the list. If you want to remove yourself from the list, you must make someone else creator first.
Giving other members access to send to the List
This can only be done by the person who created the list (or someone who has WebCollect role Creator). Click on "view" to go to the list. Find the member in the list, and click on "change role". Select the relevant role and click on "save". Important: For a member to be able to send to the list, they must also have a WebCollect role of at least Event Coordinator. Click here for details of how to assign a WebCollect role to a member. Event Coordinator is the ideal role to use if you only want them to have limited access to send to their list, but not have full access to the administration panel.
Members with administrative role Creator have sending rights on every list, and the right to add/remove members and assign roles for the list, even if they are not a member of the list.
