Create the draft
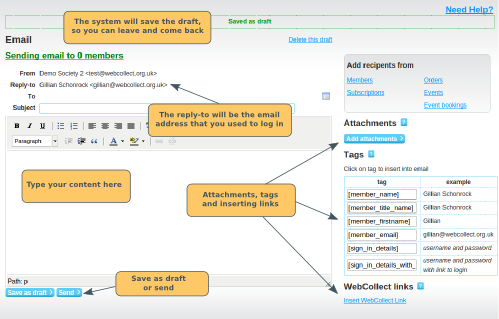
From admin home, click on New email in the Emails / SMS sent section. This will take you to a page where you can type your text.
Reply to Email Address
The "reply to" email address will be your own email address, unless you have an invalid email address (in which case it will be the email address that is configured for the organisation). If you want the "reply to" email to be a different email address, you will need to login to WebCollect with that email address (which will need to have appropriate administrator rights to send the email).
If you create a draft email and save it, and then someone else sends the email, the "reply to" email address will automatically be changed to their email address.
Personalising your email - using tags
Tags allow you to insert personalised content into your email, for example: Dear [member_firstname], will be sent as: Dear Jane, (to Jane Smith), and: Dear John, (to John Smith). Click here for further details on tags.
Attachments
You can attach files to your email. The documents can be pdf, doc, docx, xls, xlsx, ppt, pptx, jpg, png, gif. Maximum file size is 3MB for each attachment.
Inserting Links in your email
Inserting WebCollect Links. Place your cursor at the relevant point in your email text where you want to insert the link. Then click on Insert WebCollect link (right hand side of the page). Click here for full details on inserting WebCollect links.
Requires
login. If you are
selecting a link that requires login, you may want
to also include the [sign_in_details] tag, so that
the member has their login details to
hand. Click here for
details on inserting tags.
Inserting a link to another website. Type the words that you want to become clickable. Then select the words (hold down the left click on the mouse or hold down shift and use the right arrow on your keyboard). Click on the chain link icon above the text area. Click here for more details on inserting links to another website.
Selecting who you want to email
Sending to a few people
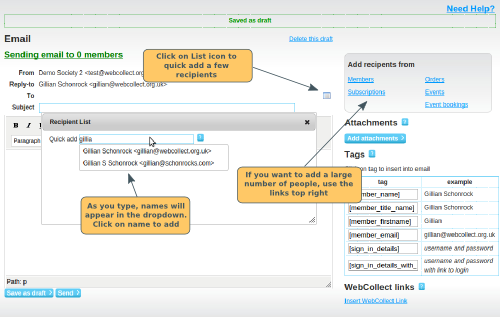
If you just want to send the email to one or two people, you can click on the List icon in the To section. This pops up a quick finder, where you can start typing in the member's name. Click on their name as it appears in the dropdown to add it to the recipient list.
Sending to a large group
On the right hand side of the draft page, click on Members, Subscriptions, Orders, Events or Event Bookings to find the set of members that you want to text. Click here for details on how to select groups to send emails to.
Sending to a list
If you are sending the email to a pre-saved list, in admin home click on Email all next to the relevant list in the Emails/SMS sent section.
Changing your list of
recipients
If you want to change the list of recipients, click on the list icon to the right of the To section. You can add/remove recipients there.
Members who do not have a valid email address
If these members are in a group, the email will automatically go to the email address of the group admin instead. Click here for more details.
Sending the Email
Once you are ready, click on the Send button to send the email.
Individual emails. The email will be sent to each member individually (so they won't see who else it was sent to).
Saving a draft of your email. If you want to save a draft of your email to finish later, click on Save as draft. To find it later, click on View All in the Emails Sent section of the admin panel. Click on edit next to the draft.
Sent emails. Once you have sent the email, it will be shown in your list of recent emails sent in the administration panel. Click on view to see who it was sent to, the text of the email and any attachments that were sent.
Sending the same email again or one like it
If you want to send an email again, for example to a different set of members, or send one that is quite similar, you can make a copy of the email.
To find the email that you want to copy, click on View All in the Emails/SMS Sent section of the admin panel. Click on view next to the email. Then at the top of the page, you will see a button labelled Create a new email like this. This will create you a new draft email with the same content and set of recipients. You can then change the content/recipients before sending.
Note: This feature is only available for Custom emails (sent via the process above. It is not available for prepared emails or subscription renewal emails.

