Import or not?
You can add all your members details manually into the system, but if you have quite a few, it will be quicker to upload the information via a csv file. Not sure whether to import data or not? Click here for advice on the trade-offs.
Your customised import template
From Admin Home, click on the Import link in Membership Summary. You can choose between:
- Individuals only. Use this if your organisation has members who are not associated with each other, and you don't have group subscriptions.
- Families or juniors and individuals. Use this if you have some members who are part of the same family, or you have junior or group subscriptions.
Once you have made your selection, a download link will appear. Click on the link to download your customised template. This is a CSV file, which you can open with Excel, Open Office or other spreadsheet packages.
In it you will find columns for the standard WebCollect fields. If you have created a membership form, you will also find the membership form fields in columns, ready for you to complete. The first few rows of the spreadsheet will be comp
Completing your template
Save the csv file and delete all rows other than the first row (the later rows display sample data to show you what kind of information you can have in each column).
The template will include the columns listed below.
- Unique Group id (only if importing group information - see section below). Leave blank for individuals.
- Group name (only if importing group information - see section below). Leave blank for individuals.
- Group admin (only if importing group information - see section below). Leave blank for individuals.
- Email (must be unique for each member row in your spreadsheet).
- Unique member id. It can be a number or alphanumeric (e.g. AB1/23)
- Title
- First name
- Surname
- Home Number. Don't worry if Excel wiped the 0 off the front. The system will put it back for you on import.
- Mobile Number Don't worry if Excel wiped the 0 off the front.
- Work Number Don't worry if Excel wiped the 0 off the front.
- Date of Birth (this MUST be in the format dd/mm/yyyy)
- 1st line address
- 2nd line address
- 3rd line address
- 4th line address
- Postcode
- Country
After these standard WebCollect fields, the template will list your membership form fields. Click here for details on completing these columns.
If any data is missing for a member, just leave that field blank. If the email address is blank, the system will allocate them a "temporary WebCollect email address". We do that because they must have an email address to be able to login to WebCollect and we use that as the unique piece of information to identify the member.
Make sure you have kept the column headings in the template, and not changed them. We use these to map your data to the right place in the system. If you change your membership form fields, download the new version of the template to get the correct set for import.
Members sharing email addresses
We use email address as the unique piece of information to identify members. If you have members (e.g. couples) who share a family email address (e.g. family@thesmiths.com), when you add the members, put the shared email address on the person who you want to be the family admin for the group. Leave the email address blank for the other family members - they will be given a temporary WebCollect email address so that they can log in. For family groups, emails sent to remind members to renew subscriptions etc, are sent to the family admins.
Importing Group information
To import group information, before you import make sure that the download import type on the right hand side of the screen is set to "". This tells the system that you have group information to import.
Non-members (e.g. Parents): If you have contact details for non-members (particularly parents who purchase junior subscriptions for their children), include them in your spreadsheet, grouped together with their children if appropriate. They will then be able to login and renew subscriptions on their children's behalf, receive emails relating to events etc. Also include other non-members of the organisation if you want to be able to email them. You will be able to identify the non-members in the system by filtering for members without a current paid up subscription.
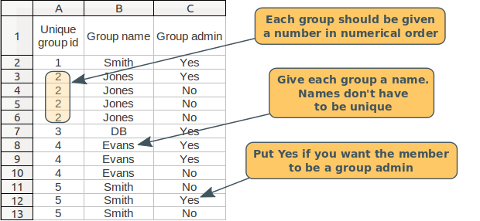
Complete the first 3 columns in your spreadsheet as follows:
- Group id. Each group should be given a number (whole numbers only please). So if the first 3 members (rows in your spreadsheet) are a group, put 1 next to each of them. The next member is an individual, so leave the 3 columns blank for them. The next 2 members are a group, so they each get a 2, and so on. We recommend that your members are sorted by their groups because the data is easier for you to check, but they don't have to be. Note: If you already have members in the system in groups, make sure you use different group ids, so you don't accidentally add them to an existing group.
- Group name. Give each group a name. If they are a family, we suggest a surname. For corporate groups, the company name. These don't have to be unique, so if you have 2 families called Smith, you can use the same group name for each group (just make sure the groups have different id numbers).
- Group admin. Put Yes if you want the member to be a group admin (and No if not). Group admins have administrative rights over the whole group. This means they can edit the details of other members of their group and buy/renew subscriptions on their behalf. If you send an email to a member who does not have a valid email address, the email will automatically be sent to the group admin instead. Generally we recommend that you make the adults group admins, but not the children. There must be at least one group admin in every group.
Note: If you make a mistake during import, you can easily move members from one group to another after you have uploaded the members. Click here for full details on moving members between groups.
Phone numbers and addresses: Phone numbers are stored against each individual member. So if members of the group share the same number (e.g. home number), copy the number against each group member (row in your spreadsheet). With addresses, we have a feature for group members to share the address stored for the first member in the group. This makes it easier for the member - if they change their address, they only need to change it in the system once (not once per group member). You can just include the address for the first member in the group and leave the others blank if you want.
Save your data as a csv file
Once you have tidied up your data, you need to save it as a csv file before you can upload it. CSV files are only one sheet, so if you have saved your data on multiple sheets, combine them into one and make sure you are clicked on that sheet when you save it as a csv.
- Microsoft Office. Click on File/Save as and select csv.
- OpenOffice. Click on File/Save as and select csv. Change the "Character set" to "Unicode (UTF-8)", "Field delimiter" to "," (comma) and Text delimiter to " (double quote). "Save cell content as shown" should be ticked and "Fixed column width" unticked.
Upload your data
On the import screen, select which type of import you are doing:
- Import individuals only.
- Import families or juniors and individuals.
Then click on choose file and select the csv file you have just saved. Then click on upload.
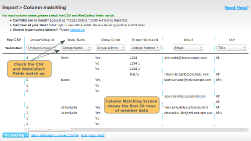
You will now be asked to check that the columns from your csv file match up correctly with the fields in the WebCollect database (so the system knows which data is which). For the WebCollect standard fields, there are dropdowns for you to correct any mismatches.
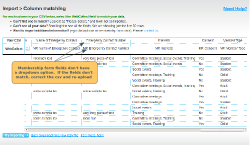
For membership form fields, if these are not correctly matched, correct the headings in the csv file. Click on Back to uploading a new csv file. Then re-upload. Download a new version of your customised template to get the uptodate headings if you need them.
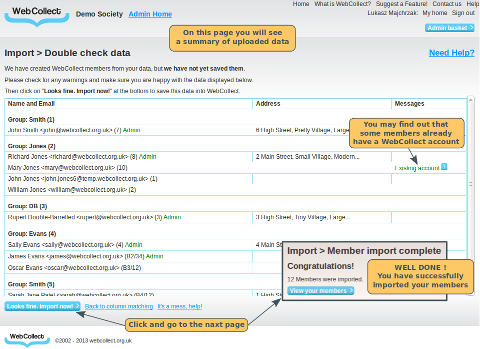
Once, you are done, click on Try Importing.
To see a list of Errors and Warnings click here
Help
All sound too complicated? If you would like us to import the data for you, then drop us an email and we are happy to help.
Importing members' current subscriptions
Click here for details on importing the members' current subscriptions.
What next?
Current subscriptions not imported
You can send out an invitational email, including each person's login details. They don't need to set up a WebCollect account and fill out the core details. If you send them straight to your organisation's subscriptions page on WebCollect, they can then buy their subscriptions and fill out any relevant forms.
Current subscriptions imported
You can send out the WebCollect subscription renewal reminder email, which includes each person's login details, a list of their current subscriptions and a link for them to click on, which takes them directly through the renewal process.


