Overview
WebCollect's event feature enables you to run any event from the Christmas Party to complex events with multiple activities.
Click here for an overview of what the event feature can do. Click here to view details on setting up event categories.
Adding a new event
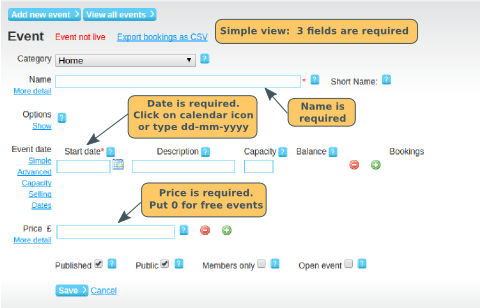
In the events section of admin home, click on the add new link. You will see the simple view for this page. The minimum information you need to create an event is:
- A name
- A start date
- A price (put 0 for free events)
Click on the more details links to see the full range of optional features and information that you can add.
Event: More Details
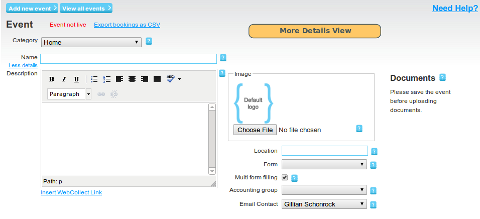
Click on the link more detail under the name field, to reveal the more details view
Clicking on more details under the Name, gives you the following options:
Name - This can be up to 255 characters.
Description - Include any additional information about the event, instructions for participants when signing up etc. You can insert a link to your other pages on WebCollect (e.g. another event) by clicking on "Insert WebCollect Link" below the description box and selecting the page you want to link to. However, if you want to link multiple events to lead members through a step-by-step process, see this feature.
Image - this must be less than 2mb however realistically it needs to be considerably smaller than this, 100KB is plenty. It can be jpg or gif, and landscape or portrait. Min pixel size is 400 x 400 and max 2,000 x 2,000. If you have a small amount of text, landscape will look better. Portrait if you have lots of text. Try uploading an image, save the event, then view the preview box below.
Location - add a brief description here. This will show on your organisation home page under the name of the event. If you want to add lots of information (e.g. directions on how to get there), you can put this in the description box or upload a document.
Email contact - in the dropdown list, you will see the list of members who have administrator rights for the organisation (name and email address). If you select one of them from the dropdown, each time someone books onto the event, that member will receive an email from WebCollect letting them know. The Email Contact is also the way of giving an "Event Co-ordinator" access rights for a particular event. The email contact's name will be displayed on the Event page, as a clickable link which opens up an email. You can only have one email contact per event.
Accounting Group - choose a group so that the money can be recorded in the right part of the organisation. For groups to appear they need to have been created. Click here for information on how to set up Accounting Groups.
Options
The options section includes:
- Configuring an event form, to collect information from participants
- Options to display event form fields publicly (e.g. to show who has booked)
- Configuration of labels/quantity box
- Multi-step navigation configuration. This links events together to lead members through a multi-step process. Click here for an example.
Click on the show link to see the options.
Event Dates
In the simple view, you can add a date and a description.
Date is required (so the system knows where to slot
it in the calendar).
Clicking on any of
the various links on the left (simple, advanced, capacity,
selling dates), will open up additional options that you can
configure. Click
here for more details on these options.
Click on the green plus sign to add additional dates. Click here for more information on configuring multi-date events.
Event Price
The price should be typed in £. If you are VAT registered, type in the VAT inclusive amount. If the event is free, put 0. The member will still need to add it to their basket and go through checkout (so we can ask them to fill out any forms etc), but they won't be asked to pay for it.
Clicking on more details or the + sign gives you the option to add different prices (e.g. £20 for members and £30 for non-members). Click here for details on how to restrict price options for some dates.
Other Configuration
Public: Untick this box if you want the event to only be displayed to administrators of your organisation. Useful for e.g. committee meetings.
Members only: Tick this box if you want the event to only be displayed to members of your organisation who have logged into the WebCollect system (they need to be logged in so the system knows who they are and can check they are a member...). If you are using this feature, you might want to consider putting a note on your organsiation's home page telling members to log in before viewing the calendar/event list. Note: Members in WebCollect are people who are associated with your organisation (including lapsed/prospective new members etc). This feature will not restrict it to just those who have a current paid up subscription.
Open Events: Tick this box if non-members can purchase tickets for the event without joining the organisation. They will not be required to complete any membership form you have configured, or go through your approval process. If they purchase an open event ticket, together with tickets for non-open events or subscriptions, they will be asked to complete the membership form in the usual way.
Admins can buy outside date range: Tick this box if you are using the Selling Dates option, and you want administrators to be able to buy before the event opens or after it closes. This is useful if you want to fill places from a waiting list, or give some members priority entry.
Publishing the Event
Once you have finished adding all your details, check that the published box is ticked and click on save. If you want to double check how the page will look to members before you publish it, untick the publish box and click on save. You will then see a Preview of how it will look to the members below. Once you are happy with it, tick the publish box and save.
Published events will continue to be displayed in the calendar, after they have taken place. If you no longer want the event to be displayed, you should unpublish the event.
Features available after you have saved the event
Documents/files
You can upload a file for members to download from the event page. The file types allowed are: pdf, doc, xls, ppt, docx, xlsx, pptx, mp4, jpg, gif, png, htm, html. Maximum file size is 30MB . This is useful for booking conditions, map for directions, or additional information about the event.
To upload the file, click on the Manage link under Documents (in the Name/More detail section). Click on Choose file, and select the file from your desktop. The label will default to the filename, but you can change it here, if you want to display something different. We recommend that you keep the file ending (e.g. .pdf), so people can see what kind of file it is.
Date/Price Combinations
If your event has multiple dates and prices, you can exclude some combinations if they do not apply. This is really useful if some of the price options are only relevant for some dates, but not all. Click here for details on the date/price combinations feature.
Event Categories
You can assign your event to a particular event category.
Viewing the event
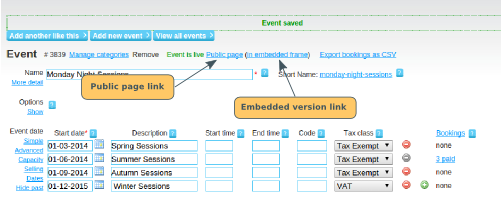
You can see the event in the Preview section. If the event is live, you can also see the public page, by clicking on the Public page link at the top of the page. If you are using embedded mode, click on the (in embedded frame) link, to see the embedded version.


